Simple Development Environment
Let's set a simple development environment using Docker.
Hi Learners😃
In this third series of a blog, we will learn about dockerfile and docker-compose and will develop a simple development environment.
As usual before that, if you haven't watched the previous blog, please check it out. blog.quasarcommunity.org/introduction-to-do..
LET'S DIVE IN
Dockerfile
dockerfile is a text document that contains all the commands a user could call on the command line to assemble an image.
There are commands we can use in dockerfile.
FROM - Creates a layer from the image
PULL - Adds files from your Docker repository
RUN - Builds your container
CMD - Specifies what command to run within the container
Docker compose
compose is a tool for defining and running multi-container docker applications. with compose, we use a YAML file to configure docker applications. Then, with a single command, you create and start all the services from your configuration.
There are lots of options to run with compose.
check out docs.docker.com/compose
YAML
YAML stands for yet another markup language YAML is a human-readable data-serialization language. It is commonly used for configuration files and in applications where data is being stored or transmitted. One of the most common uses for YAML is to create configuration files. It's recommended that configuration files be written in YAML rather than JSON, even though they can be used interchangeably in most cases because YAML has better readability and is more user-friendly.
With this knowledge let's develop a node.js development environment using docker.
Let's first create Dockerfile
open your favourite IDE, in my case I 'll use vscode
create a file called Dockerfile.
Note here Dockerfile is case-sensitive, D should be capital.
FROM ubuntu:18.04
ENV DEBIAN_FRONTEND=noninteractive


RUN apt update && apt upgrade -y
RUN apt install htop git curl sudo openssh-server -y

RUN useradd -rm -d /home/ubuntu -s /bin/bash -g root -G sudo -u 1000 sabarish
RUN  echo 'sabarish:password' | chpasswd


RUN curl -sL https://deb.nodesource.com/setup_16.x | sudo -E bash -
RUN sudo apt install nodejs -y
RUN bash -c "$(curl -fsSL https://raw.githubusercontent.com/ohmybash/oh-my-bash/master/tools/install.sh)"
RUN apt install -y locales locales-all
RUN locale-gen --purge en_US.UTF-8
RUN service ssh start

EXPOSE 80 22

CMD ["/usr/sbin/sshd","-D"]
This seems a little confusing, but I will explain,
FROM ubuntu:18.04
this command installs the image for our environment. you can give whatever images you need.
RUN apt update && apt upgrade -y
RUN apt install htop git curl sudo openssh-server -y
this line updates and upgrades the image after getting installed, then installs the tools required for the development.
RUN useradd -rm -d /home/ubuntu -s /bin/bash -g root -G sudo -u 1000 sabarish
RUN  echo 'sabarish:password' | chpasswd
This command creates a user for the image.
RUN curl -sL https://deb.nodesource.com/setup_16.x | sudo -E bash -
RUN sudo apt install nodejs -y
This command installs node.js
RUN bash -c "$(curl -fsSL https://raw.githubusercontent.com/ohmybash/oh-my-bash/master/tools/install.sh)"
This command is for attraction, this is called oh-my-bash when we install and run the ubuntu image the terminal will be the default and simple. with this installation, we can get an attractive terminal.
RUN service ssh start
This will start the ssh server so that we can log in with the user we created.
SSH is noting but a secure shell, we can able to remotely log in to the OS shell by command line securely.
EXPOSE 80 22
This command will open he port. 80 for web 22 for ssh
CMD ["/usr/sbin/sshd","-D"]
It Specifies what command to run within the container, here ssh will be running entirely.
Docker-compose.yml
version: '3.9'

services:
    web:
        build: .
        hostname: noel
        ports:
            - "81:81"


    mongodb:
        image: mongo
        ports:
          - 27017:27017
        hostname: mongo
        environment:
          - MONGO_INITDB_ROOT_USERNAME=admin
          - MONGO_INITDB_ROOT_PASSWORD=password

    mongo-express:
        image: mongo-express
        ports:
          - 8081:8081
        hostname: mongo-express
        environment:
          - ME_CONFIG_MONGODB_ADMINUSERNAME=admin
          - ME_CONFIG_MONGODB_ADMINPASSWORD=password
          - ME_CONFIG_MONGODB_SERVER=mongodb
        restart: unless-stopped
version: '3.9'
This command specifies the version of docker compose.
services:
service is like containers we are creating. with this docker compose will treat every containers in a same network.
    web:
        build: .
        hostname: noel
        ports:
            - "81:81"
Here WEB is the container name.
Build is building the image or the dockerfile we created. the . is the current directory the dockerfile is located.
Hostname is giving hostname and port is we are opening the port.
  mongodb:
        image: mongo
        ports:
          - 27017:27017
        hostname: mongo
        environment:
          - MONGO_INITDB_ROOT_USERNAME=admin
          - MONGO_INITDB_ROOT_PASSWORD=password

    mongo-express:
        image: mongo-express
        ports:
          - 8081:8081
        hostname: mongo-express
        environment:
          - ME_CONFIG_MONGODB_ADMINUSERNAME=admin
          - ME_CONFIG_MONGODB_ADMINPASSWORD=password
          - ME_CONFIG_MONGODB_SERVER=mongodb
        restart: unless-stopped
Similarly, we are doing for both mongodb and mongo-express.
Commands
run docker compose up
$ docker compose up
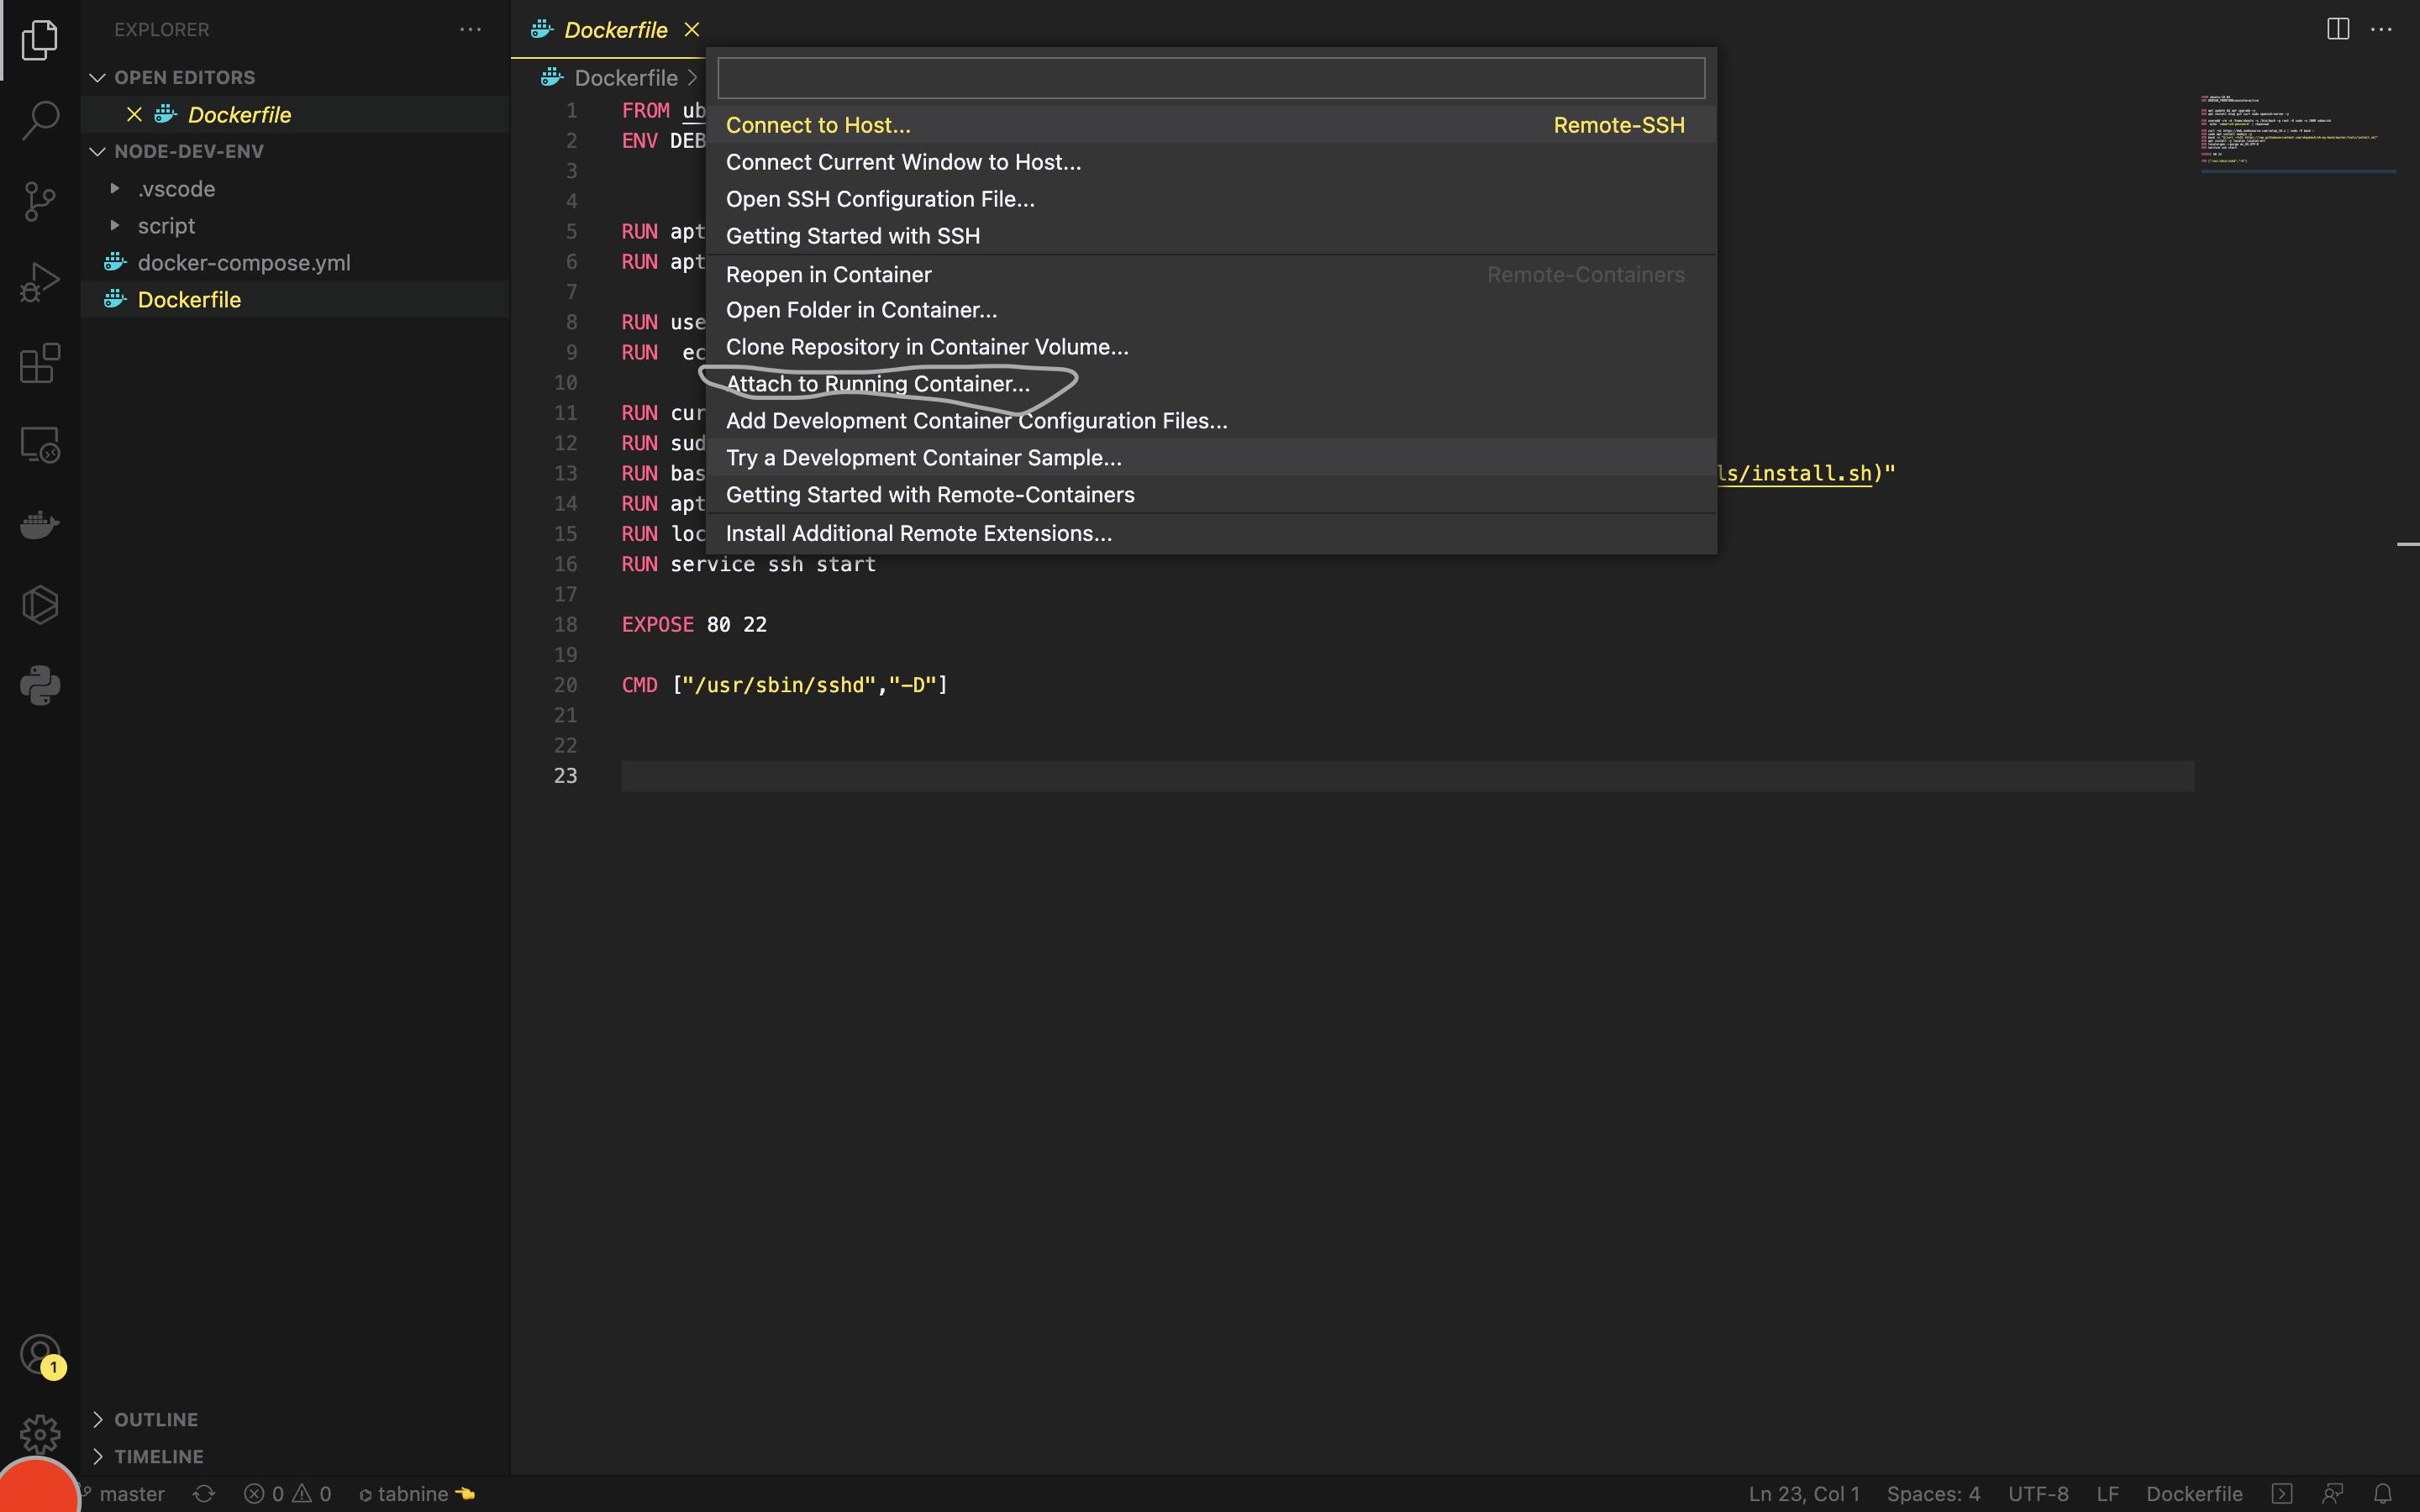
Then in vscode, in bottom left, click on that icon.
Click on attach to running container
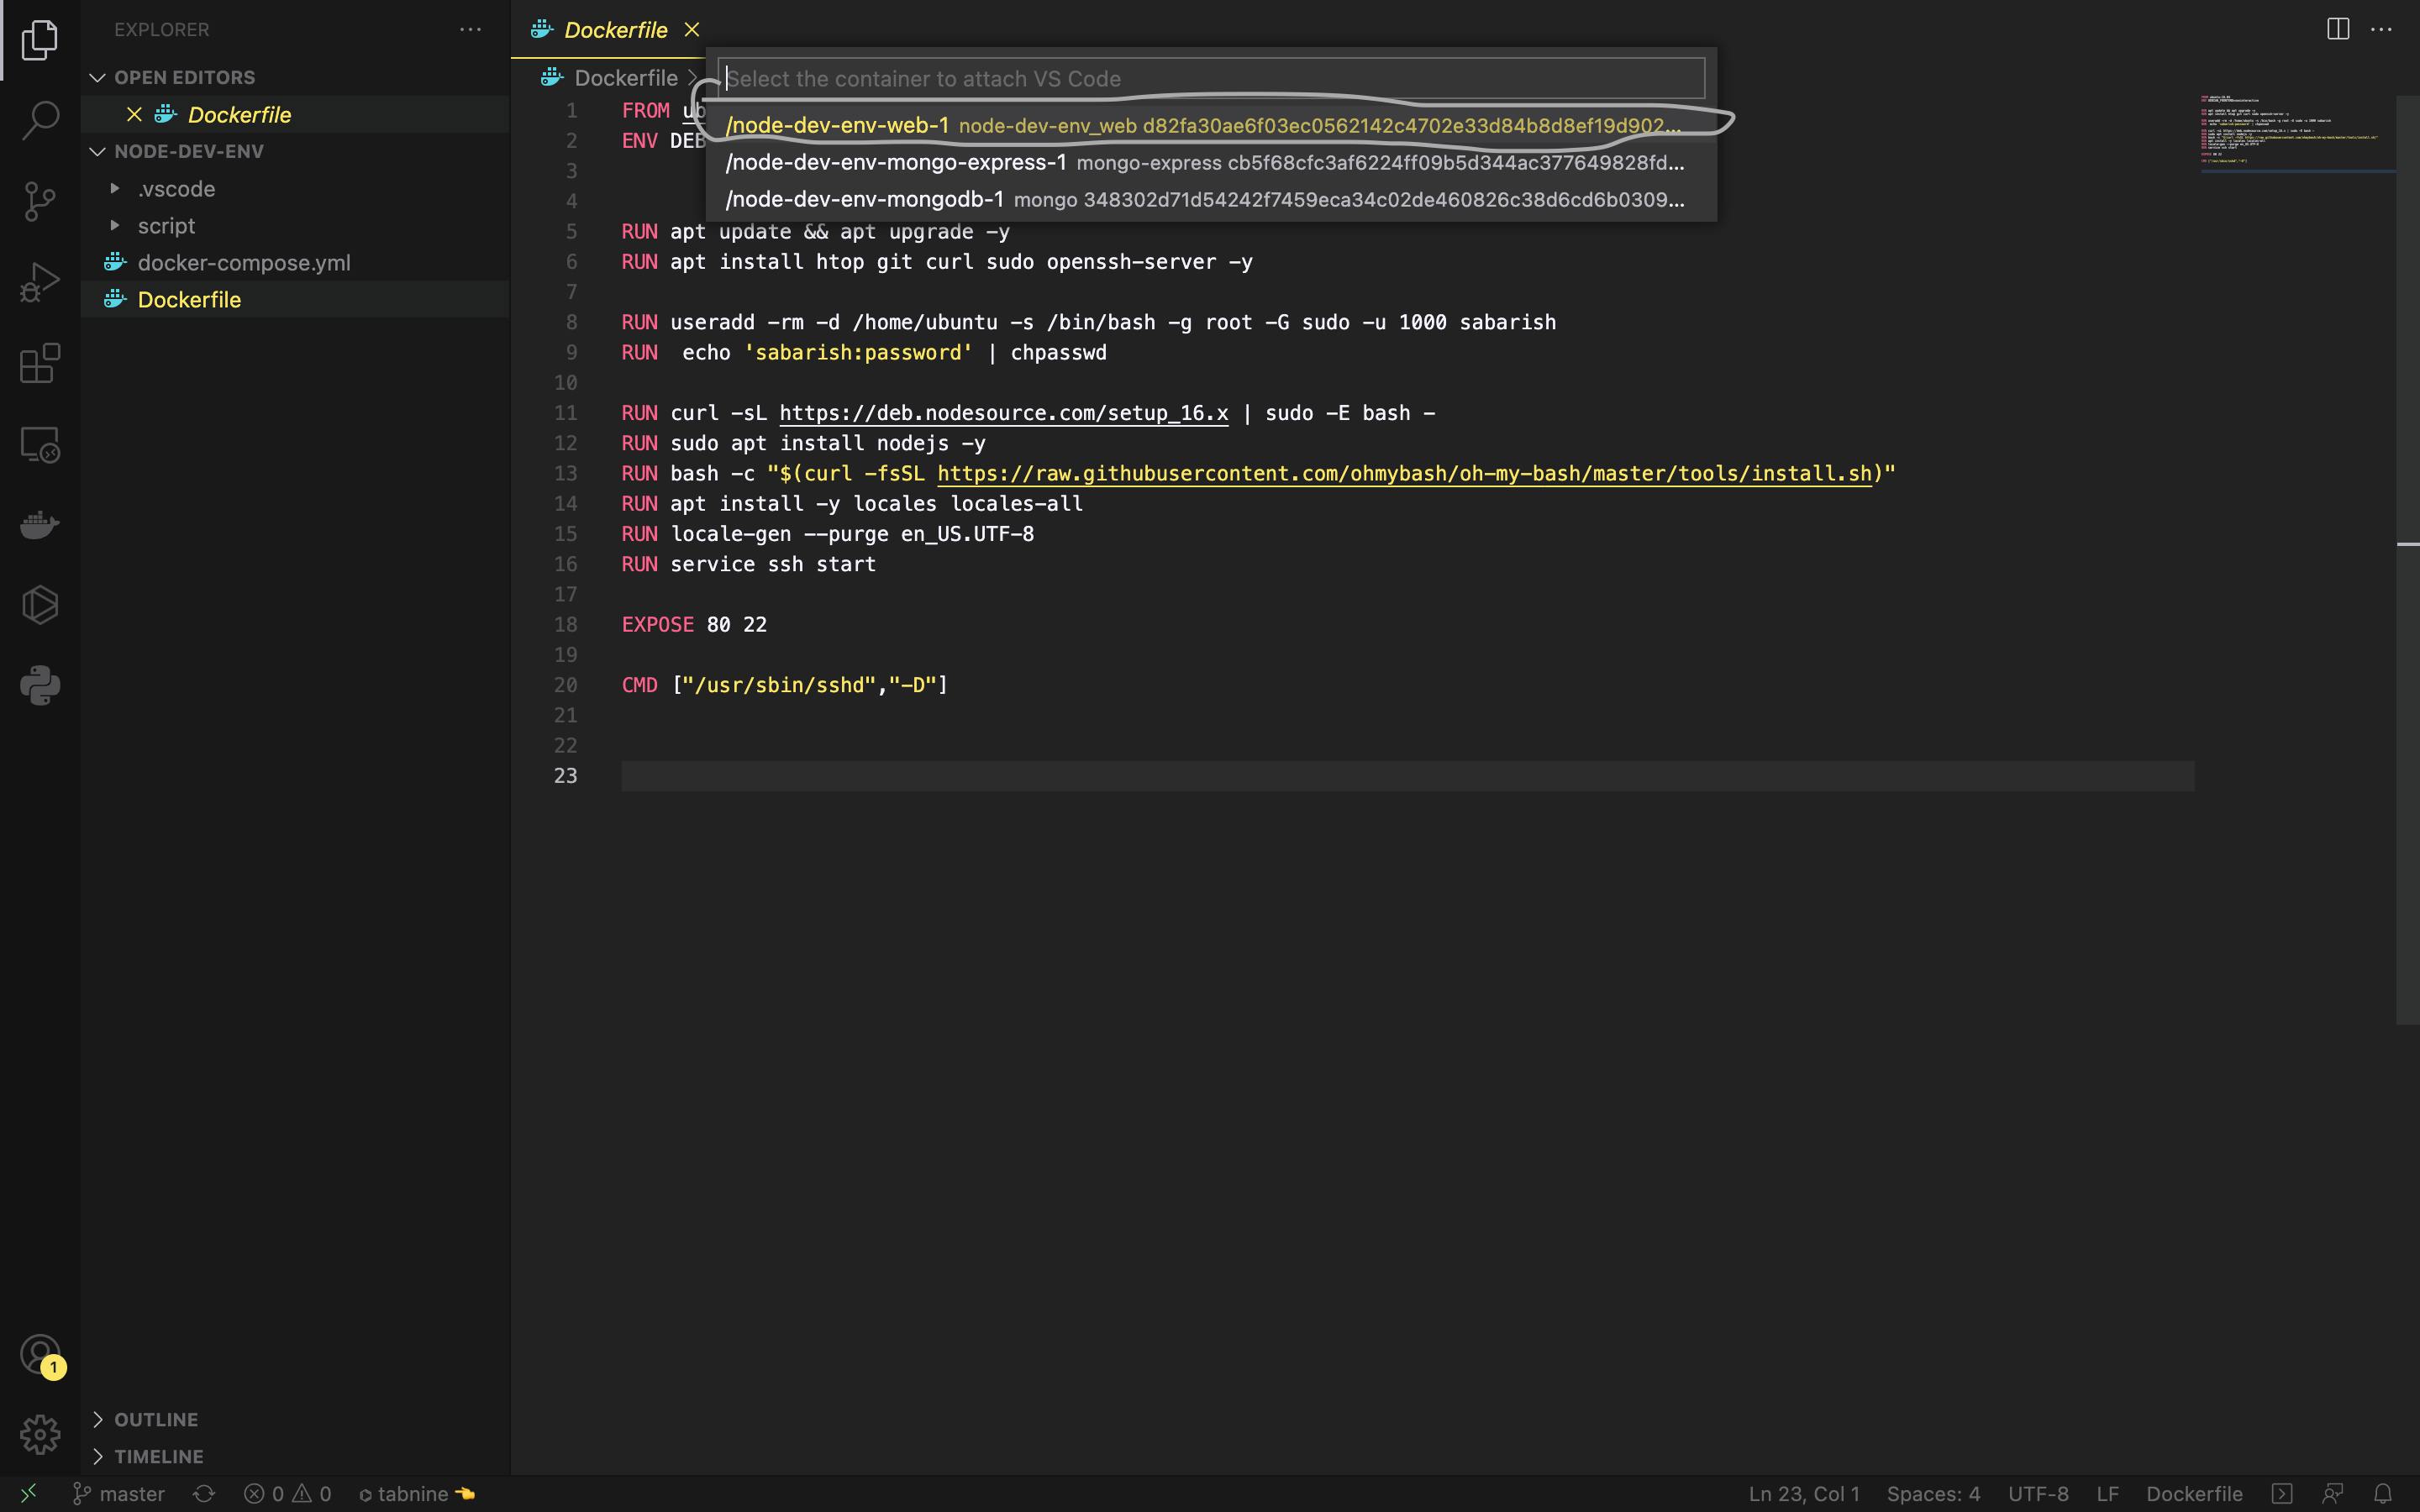
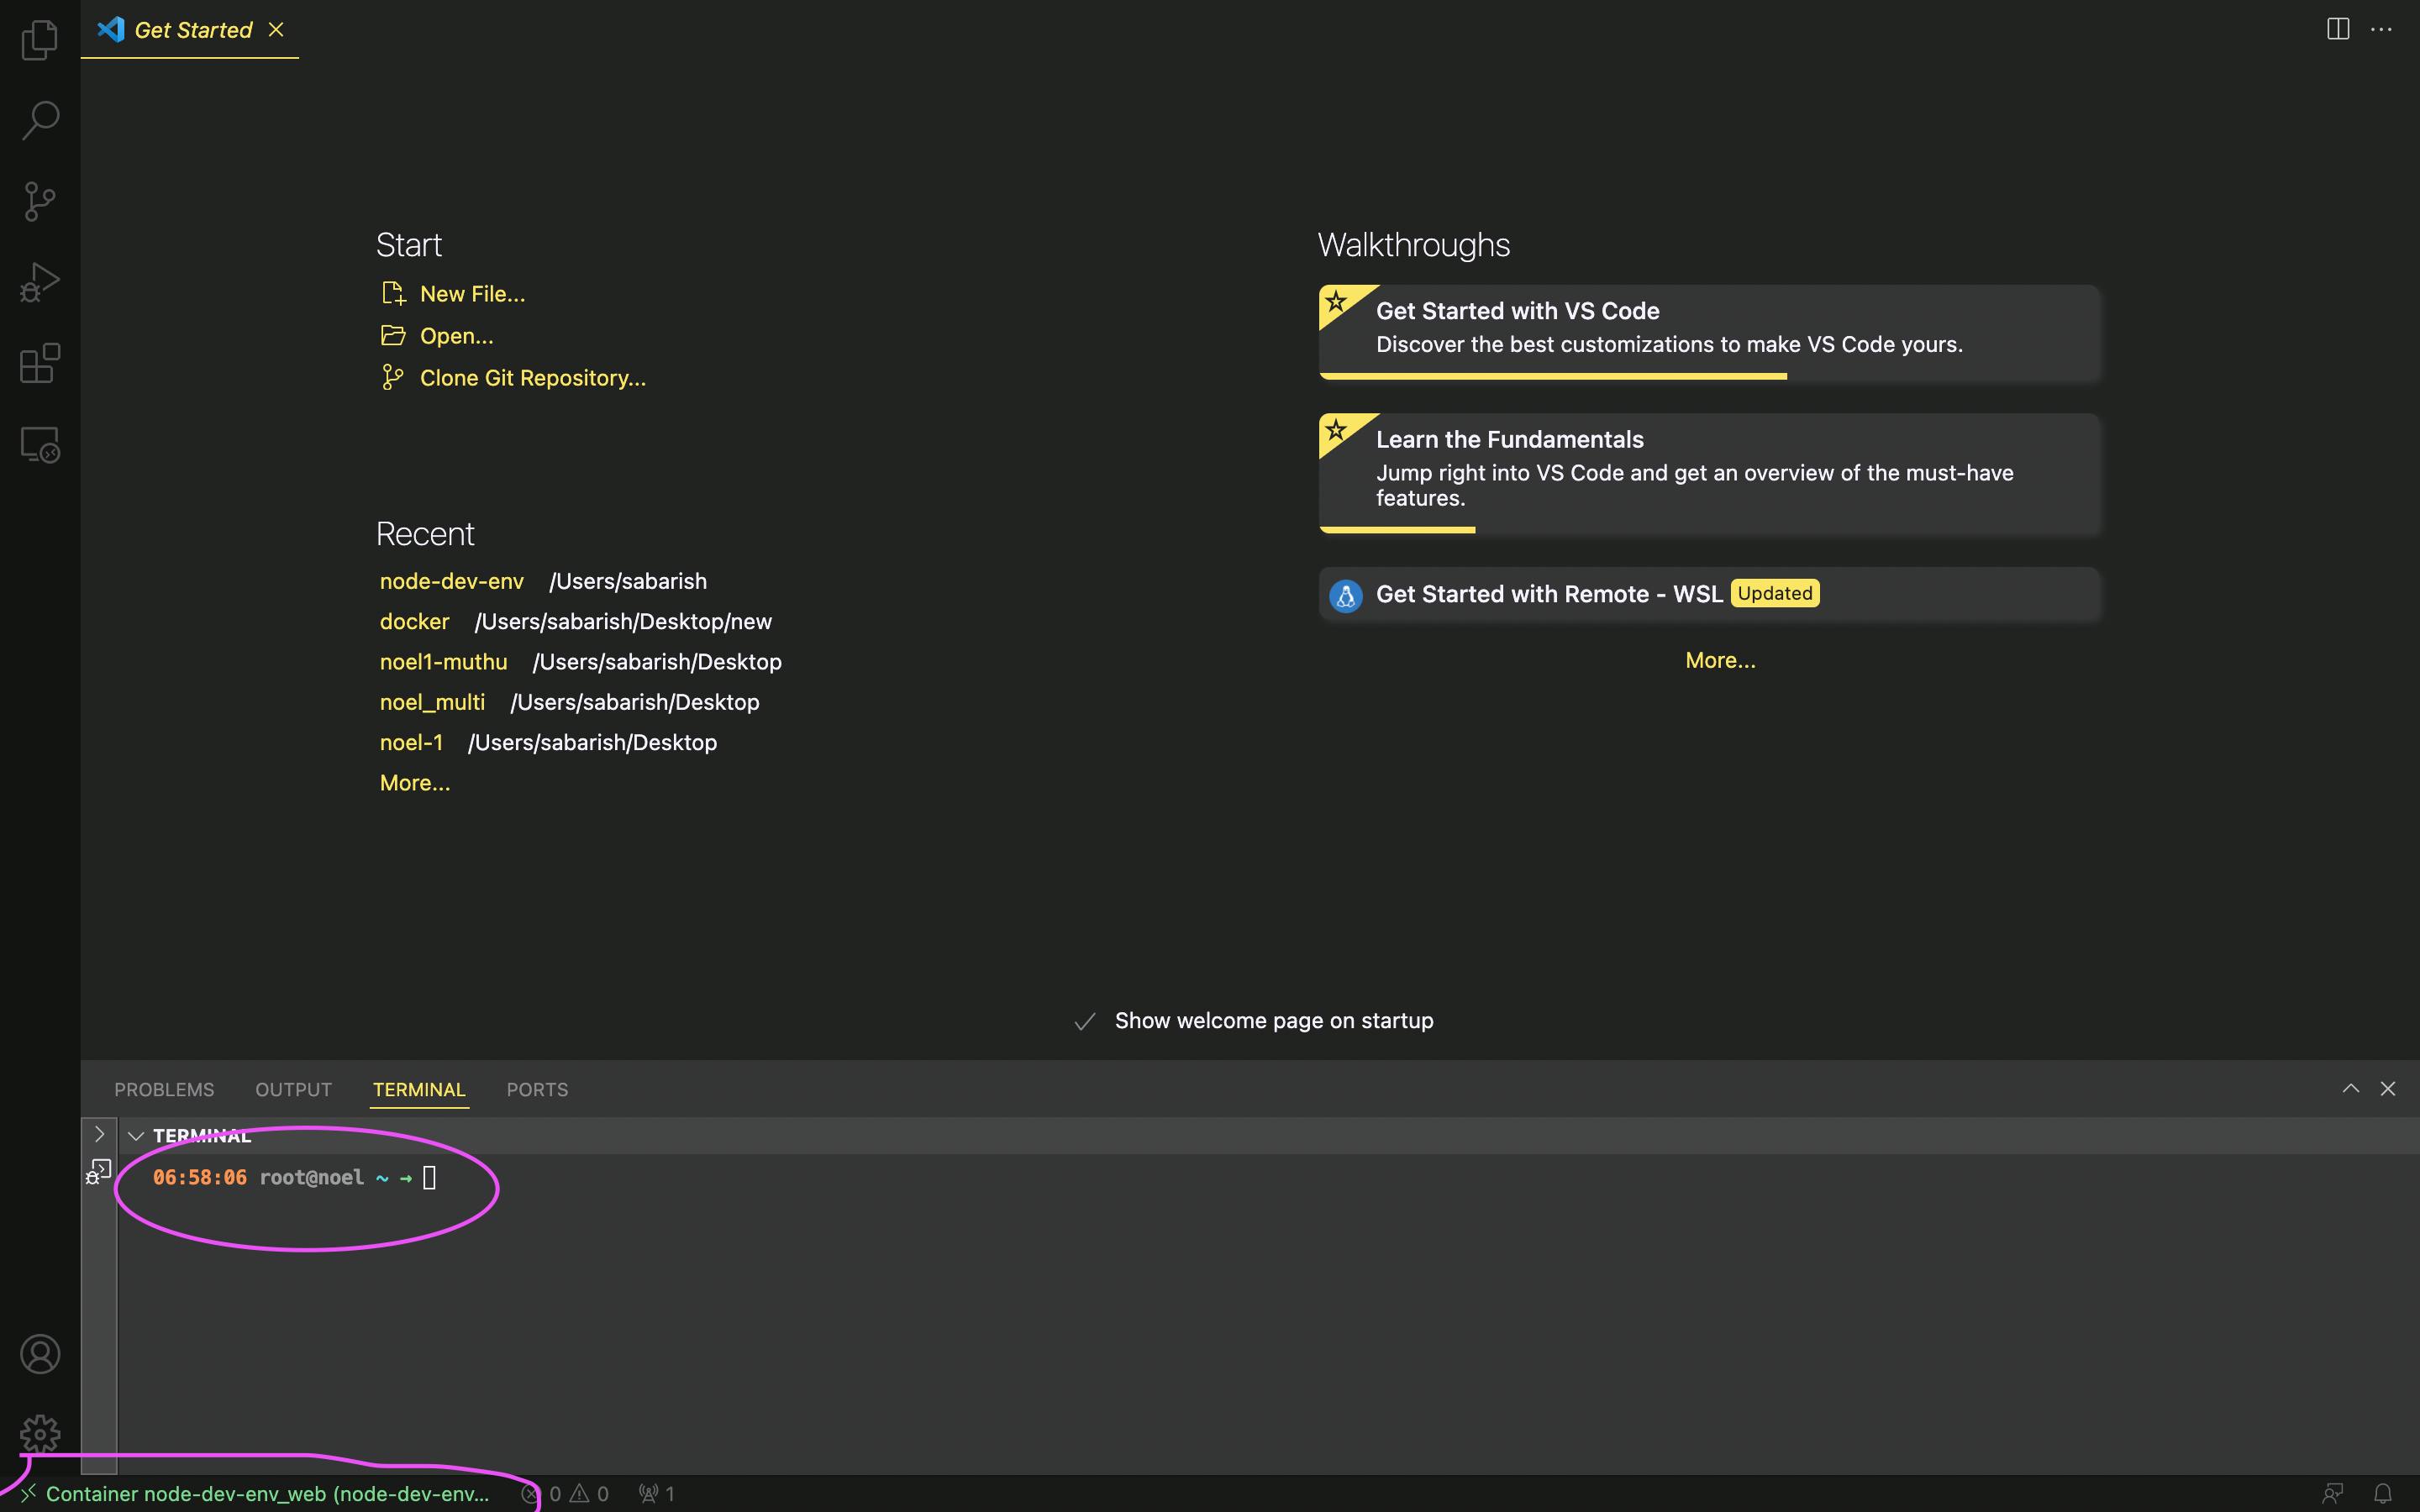
Click on the noel-web
in the browser go to, localhost:8081
this is for the mongo-express. you can create db and insert collections.
1.

2.

3.

We came to the end of this blog. This seems to be confusing in beginning but read it again and again. With this knowledge, you can develop any development environment you need if it is possible in docker. here is the GitHub link - github.com/sabarishkrishna/node-dev-env

