
Support Vector Machine(SVM)
In this blog, we are going to learn and practice interesting topic about Support Vector Machines

RECAP
Previous blog, we learned how to predict the weather and if the weather is fit to play or not. Likely we discuss another interesting machine learning algorithm here.
SVM
Here we are going to introduce another approach to classification using a family of algorithms called support vector machines. They can work with both linear and non-linear scenarios, allowing high performance in many different contexts. Together with neural networks, SVMs probably represent the best choice for many tasks where it's not easy to find out a good separating hyperplane. For example, It takes the past data as an input and outputs a line or a hyper-plane which separates the mixed data into classes. If Past data contains both strawberry and apple information to recognize what apples and strawberries look like. That’s SVM in play. It analyses the data and classifies it into one of the two categories based on the labeled data it already has. It will sort the apples under the apple category and the strawberries under the strawberry category.
Linear support vector machines
The fundamental idea behind SVMs is best explained with some pictures.
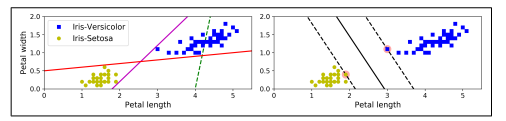
The two classes can clearly be separated easily with a straight line (they are linearly separable). The left plot shows the decision boundaries of three possible linear classifiers. The model whose decision boundary is represented by the dashed line is so bad that it does not even separate the classes properly. The other two models work perfectly on this training set, but their decision boundaries come so close to the instances that these models will probably not perform as well on new instances. In contrast, the solid line in the plot on the right represents the decision boundary of an SVM classifier; this line not only separates the two classes but also stays as far away from the closest training instances as possible. You can think of an SVM classifier as fitting the widest possible street (represented by the parallel dashed lines) between the classes. This is called large margin classification.
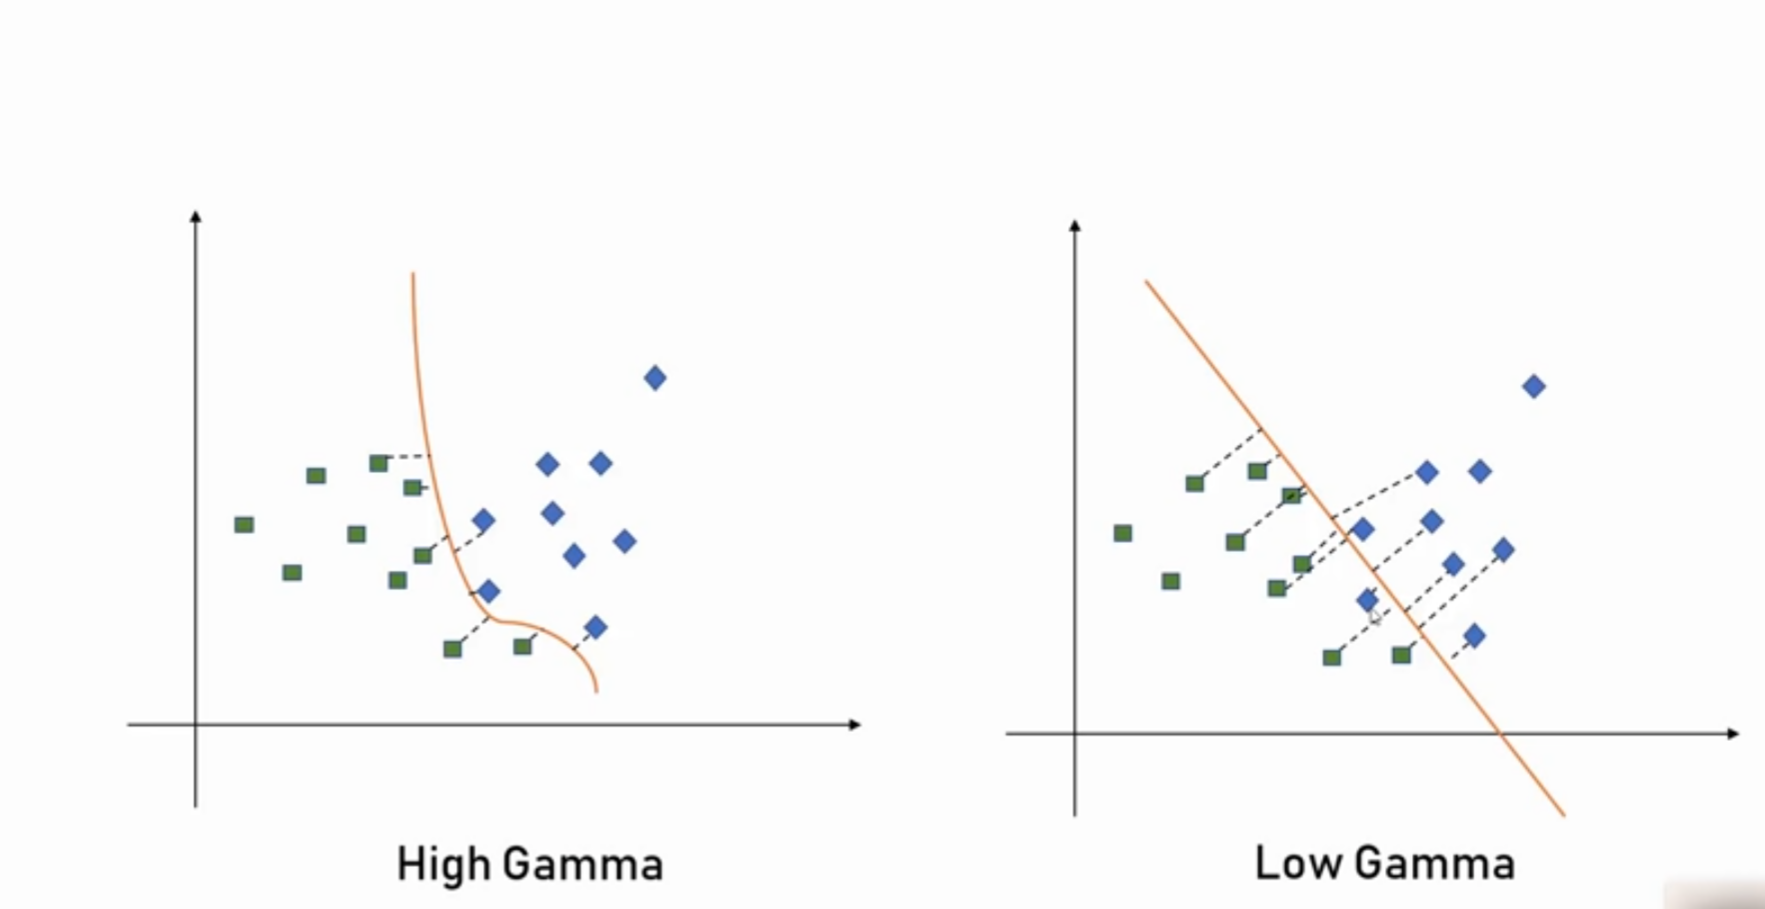
What is Gamma?
Gamma parameter defines how far the influence of a single training example reaches, with low values meaning ‘far’ and high values meaning ‘close’. The gamma parameters can be seen as the inverse of the radius of influence of samples selected by the model as support vectors.
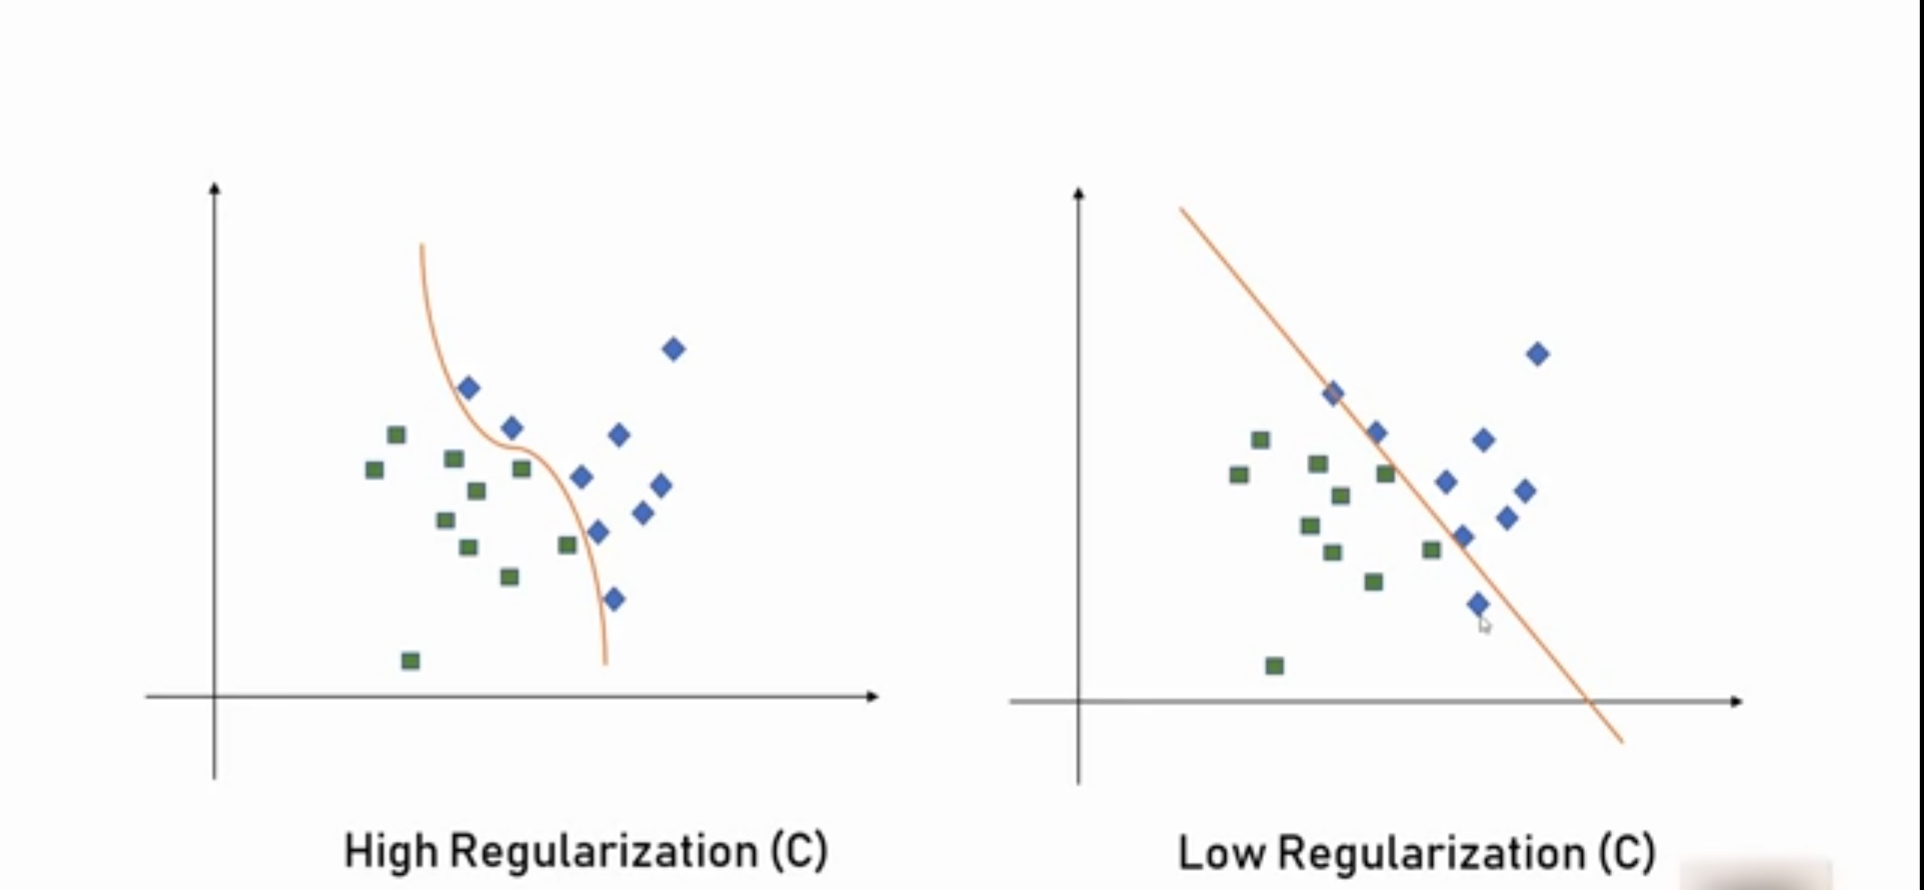
What is Regularization?
The Regularization parameter (often termed as C parameter in python’s sklearn library) tells the SVM optimization how much you want to avoid misclassifying each training example. For large values of C, the optimization will choose a smaller-margin hyperplane if that hyperplane does a better job of getting all the training points classified correctly. Conversely, a very small value of C will cause the optimizer to look for a larger-margin separating hyperplane, even if that hyperplane misclassifies more points.
Kernel
SVM algorithms use a set of mathematical functions that are defined as the kernel. The function of kernel is to take data as input and transform it into the required form.
Example
Text Classification
Tool Used: Python IDE
import pandas as pd
import numpy as np
from nltk.tokenize import word_tokenize
from nltk import pos_tag
from nltk.corpus import stopwords
from nltk.stem import WordNetLemmatizer
from sklearn.preprocessing import LabelEncoder
from collections import defaultdict
from nltk.corpus import wordnet as wn
from sklearn.feature_extraction.text import TfidfVectorizer
from sklearn import model_selection, naive_bayes, svm
from sklearn.metrics import accuracy_score

#Set Random seed
np.random.seed(500)

# Add the Data using pandas
Corpus = pd.read_csv(r"C:\Users\gunjit.bedi\Desktop\NLP Project\corpus_small.csv",encoding='latin-1')

# Step - 1: Data Pre-processing - This will help in getting better results through the classification algorithms

# Step - 1a : Remove blank rows if any.
Corpus['text'].dropna(inplace=True)

# Step - 1b : Change all the text to lower case. This is required as python interprets 'dog' and 'DOG' differently
Corpus['text'] = [entry.lower() for entry in Corpus['text']]

# Step - 1c : Tokenization : In this, each entry in the corpus will be broken into a set of words
Corpus['text']= [word_tokenize(entry) for entry in Corpus['text']]

# Step - 1d : Remove Stop words, Non-Numeric and perform Word Stemming/Lemmenting.

# WordNetLemmatizer requires Pos tags to understand if the word is noun or verb or adjective etc. By default it is set to Noun
tag_map = defaultdict(lambda : wn.NOUN)
tag_map['J'] = wn.ADJ
tag_map['V'] = wn.VERB
tag_map['R'] = wn.ADV


for index,entry in enumerate(Corpus['text']):
    # Declaring Empty List to store the words that follow the rules for this step
    Final_words = []
    # Initializing WordNetLemmatizer()
    word_Lemmatized = WordNetLemmatizer()
    # pos_tag function below will provide the 'tag' i.e if the word is Noun(N) or Verb(V) or something else.
    for word, tag in pos_tag(entry):
        # Below condition is to check for Stop words and consider only alphabets
        if word not in stopwords.words('english') and word.isalpha():
            word_Final = word_Lemmatized.lemmatize(word,tag_map[tag[0]])
            Final_words.append(word_Final)
    # The final processed set of words for each iteration will be stored in 'text_final'
    Corpus.loc[index,'text_final'] = str(Final_words)

#print(Corpus['text_final'].head())

# Step - 2: Split the model into Train and Test Data set
Train_X, Test_X, Train_Y, Test_Y = model_selection.train_test_split(Corpus['text_final'],Corpus['label'],test_size=0.3)

# Step - 3: Label encode the target variable  - This is done to transform Categorical data of string type in the data set into numerical values
Encoder = LabelEncoder()
Train_Y = Encoder.fit_transform(Train_Y)
Test_Y = Encoder.fit_transform(Test_Y)

# Step - 4: Vectorize the words by using TF-IDF Vectorizer - This is done to find how important a word in the document is in comparison to the corpus
Tfidf_vect = TfidfVectorizer(max_features=5000)
Tfidf_vect.fit(Corpus['text_final'])

Train_X_Tfidf = Tfidf_vect.transform(Train_X)
Test_X_Tfidf = Tfidf_vect.transform(Test_X)


# Step - 5: Now we can run different algorithms to classify out data and check for accuracy

# Classifier - Algorithm - Naive Bayes
# fit the training dataset on the classifier
Naive = naive_bayes.MultinomialNB()
Naive.fit(Train_X_Tfidf,Train_Y)

# predict the labels on validation dataset
predictions_NB = Naive.predict(Test_X_Tfidf)

# Use accuracy_score function to get the accuracy
print("Naive Bayes Accuracy Score -> ",accuracy_score(predictions_NB, Test_Y)*100)


# Classifier - Algorithm - SVM
# fit the training dataset on the classifier
SVM = svm.SVC(C=1.0, kernel='linear', degree=3, gamma='auto')
SVM.fit(Train_X_Tfidf,Train_Y)

# predict the labels on validation dataset
predictions_SVM = SVM.predict(Test_X_Tfidf)

# Use accuracy_score function to get the accuracy
print("SVM Accuracy Score -> ",accuracy_score(predictions_SVM, Test_Y)*100)
From the code we learned how to classify the text and find the accurracy using the dataset.
We will learn new things in the upcoming blog, until connect with me and share this blog with your friends and colleagues!....💖.